Recipes

1-hour Vegan Nutella Star Bread (+ other filling ideas)


I’ve been drooling over the star bread trend, but figured I lacked the patience and artistry to make it… I’m just not very good at making food look pretty. But then I realized that if I could whip up a *super quick* version, then it wouldn’t be so sad if it turned out to be an ugly mess 😉

(PS: If you’re wondering why I haven’t posted in awhile, I talk about it on my Instagram!)

There weren’t any solid-looking quick vegan recipes for star bread out there, so I made my own! I used my go-to cinnamon roll dough, which doesn’t require the typical hours of rising time but still gets super poofy. And it requires hardly any ingredients.

If you have your own favorite cinnamon roll dough, you can definitely use that instead. Just follow the directions, including rising, for your dough. I suggest that you don’t let it rise after assembling the star, though, or the shape could lose definition.

This recipe is also super versatile in terms of fillings! Instead of the vegan nutella (Justin’s, Artisana, and Nocciolata are all great options), you can use things like:

  • Vegan butter + cinnamon + sugar
  • Jam
  • Apple or pumpkin butter
  • Cinnamon sugar, orange zest and cranberry sauce
  • Pesto or marinara + vegan cheese (just halve the sugar in the dough)

Tips

Usually I keep these pre-recipe spiels really short, BUT this recipe is a bit more finicky than my usual chuck-in-a-pot recipes, so here are some tips on the procedure:

  • When spreading the nutella on the soft dough, it can be a little tricky–I found it helpful to approach it more as lightly scraping the nutella around with the edge of the spoon rather than spreading it per se.
  • When twisting the star arms together, make sure you REALLY pinch them together at the end, otherwise they can pop apart in the oven.
  • I found this video really helpful for the shaping method, so I highly recommend watching it or another one before beginning.
  • See the steps below:

Ingredients:

Dough:

  • 1c warm vegan buttermilk (aka 1c non-dairy milk + 1 tbsp apple cider vinegar)
  • 2 1/2c all purpose flour
  • 1 packet of instant yeast (2 1/4 tsp)
  • 2 tbsp canola oil
  • 2 tbsp sugar
  • 1/4 tsp salt

Filling:

  • 3-4 tbsp vegan nutella

Directions:

  1. Preheat oven to 350 degrees F.
  2. Make the dough: Combine all dough ingredients in a stand mixer with a dough hook, and mix it all together. Then, knead in the mixer on low for 7 minutes. If you don’t have a stand mixer, you can knead by hand. The dough should be smooth and not too sticky; if it’s wet or very sticky, add a bit more flour. Split the dough into 4 equal balls, approximately 160g each.
  3. Roll out a ball into a circle until it is about 8.5″ in diameter; anywhere 8-9″ is fine. Place the disc on a baking sheet (on either a silicon mat or parchment paper) that is at least 9×9″.
  4. Spread a heaping tablespoon of your filling evenly onto the disc, leaving about .5-1″ clearance around the edges. (See tips above)
  5. Repeat steps 3-4 with two more of the balls of dough, layering one on top of another. (So you’ll have a stack that’s dough disc, then nutella, then dough disc, and so on). For the fourth and final ball of dough, roll it into a disc as before and set it on top of your stack, but do NOT spread nutella on top of this one!
  6. (I strongly recommend watching a video like this one before starting this step.) Use a 2-3″ circular pastry cutter, glass, or jar to lightly mark a circle in the center of the dough; do not cut the dough out. Then slice the surrounding dough like a pizza into 16 equal pieces, leaving the center circle uncut. 
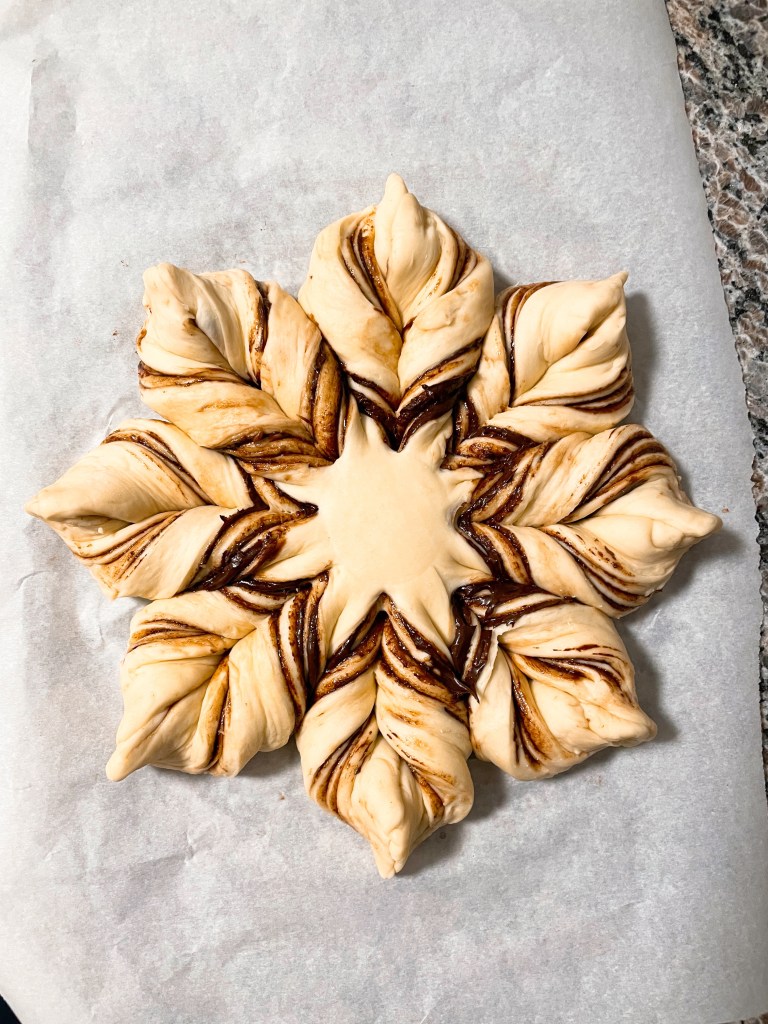
  7. To make the star arms, grab two adjacent pieces, and twist them away from each other two and a half times, then join the flat parts on the edge. Pinch them together really well so they don’t come apart! Repeat for the rest of the pieces.
  8. Bake for 25 minutes, until golden brown on top. Dust with powdered sugar.

Enjoy, and try to snap a photo of your beautiful bread before inhaling it! That was a tough one for us 😉

Enter your email address to subscribe to this blog and receive notifications of new posts by email.

Join 2,418 other subscribers

Recipes

Easy Creamy Tofu and Pea Curry (aka Matar Paneer) – Vegan, WFPB


As life gets busier (between quarantine ending and closing on a house), my BIGGEST cooking goal these days is to come up with super simple recipes that are both healthy and easy to make in bulk. And my latest favorite creation that fits the bill is this super simple tofu & pea curry!

It has all the creamy, comforting goodness of the authentic Indian version (called Matar or Mutter Paneer), but without any of the cheese, cream or oil. The only source of fat in this recipe, in fact, are cashews! (And if you want to get fat free with it, you could omit the cashew cream. But then… it wouldn’t be creamy anymore. 😉 )

And bonus, this version is high in protein!

This recipe is super simple, because the ONLY chopping required is cubing the tofu–everything else is just chucked into the blender.

I also cook this in bulk by doubling the recipe below (cooking times are the same)–it takes me about 30 mins of prep time for 8 meals’ worth of food!

Serves 4

Ingredients:

  • 1 – 16oz block super firm tofu, cubed
  • 1.5 cups frozen peas
  • 1 white or yellow onion
  • 1″ ginger
  • 5 cloves garlic
  • 1 green chili pepper (can also use ~1 tbsp canned)
  • 3/8 cup water
  • 1 tsp cumin seeds (or sub powder)
  • Half a 15oz can tomato sauce (or pureed fresh tomato)
  • 1 + 1/4 tsp coriander
  • Heaping 1/4 tsp turmeric
  • 1 tsp salt, more to taste
  • 1 tsp cayenne powder, or to taste*

Cashew cream:

  • 2/3 cup raw cashews, soaked
  • 1/2 cup water

*This will depend on the chili you use. When I use my spicier homegrown chilis, I omit the cayenne. If you use canned mild chilis, you’ll probably want to keep the cayenne in.

Directions:

  1. Add the onion, ginger, garlic, chili pepper, and 3/8c water to your blender, and blend until smooth. Let sit for a minute or two before opening it, as the chili will be airborne for a moment!
  2. Meanwhile, saute the cumin seeds with a splash of water until they start to turn brown, 1-2 minutes. Add the pureed onion mixture, and boil for 5 minutes.
  3. Stir in the tomato sauce, coriander, turmeric, and salt, and boil for another ~5 minutes.
  4. Add the cubed tofu and peas and stir them in gently, just as much as needed to combine everything, so as not to break the tofu.
  5. Set the Instant Pot to cook on high pressure for 2 mins, and let it release naturally for 10-15 minutes. (For stovetop version: simmer, covered, for 15 minutes, or until the peas are tender but not mushy. Stir it occasionally.)
  6. While the curry is cooking, blend the cashew cream ingredients, and set aside. Once the curry is done cooking, gently stir in the cashew cream.
  7. Serve with rice, paratha, or naan, and enjoy!

Enter your email address to subscribe to this blog and receive notifications of new posts by email.

Join 2,418 other subscribers

Recipes

4 Ingredient Iron-boosting Bars (Vegan)

Did you know that about 20% of women in the US are iron deficient? (Thanks largely to Aunt Flo)

I know I’ve been slacking on making sure I’m getting enough, so I’ve been researching the iron content of a ton of different ingredients, and coming up with recipes that are super high in iron.

I figured my high-iron recipes wouldn’t necessarily be the next great taste sensation given my main focus is on their nutrient content, but on day 2 of my new iron-finding kick, these bars proved me oh so wrong. They are incredibly delicious–for breakfast, snacks, or even dessert.

Just 100 calories of them provides 13% of your recommended daily intake of iron, and a breakfast-sized amount (let’s say 500 calories), satisfies a whopping 65% of your daily iron needs. (See below for more nutrition notes)

To put it in more exciting terms… calorie for calorie, these bars have 4x as much iron as chicken, and twice as much iron as STEAK!

In good news, my husband tried them and loves them so much that he keeps asking for them, and has even dubbed them “the perfect breakfast.” In bad news, a batch doesn’t last me nearly as long as I thought it would, because I had originally expected to be the only one eating them… 😛

Makes 16 bars; each 100-calorie bar has 13% of the female RDA for iron (26% of the male RDA).

Ingredients:

  • 2 cups puffed amaranth (requires about 2/3-1 cup dry amaranth)
  • 1/2 cup tahini
  • 1/4 cup + 1 tbsp molasses
  • 2 tbsp maple syrup*
  • 1/8 tsp salt (optional)
*You can sub out the maple syrup for agave, or more molasses

Directions:

  1. Preheat a pot over medium-high heat for 5 minutes. Make sure the bottom of the pot is the same size or smaller than your burner.
  2. Pop the amaranth: add one tablespoon of dry amaranth to the pot; it should start popping almost immediately (it looks like mini popcorn). Shake or stir the pot consistently while the amaranth pops. Once most of the grains have popped, or once the remaining unpopped ones starts to get a darker brown, pour out the amaranth into a separate bowl. Then repeat the process with the rest of the dried amaranth until you have 1 cup. It sounds difficult, but once you get the hang of it, it’s easy and honestly pretty fun. I found this video to be useful! (but no need to sieve it)
  3. Once cooled, add the popped amaranth to a 9″ square (or round) pan, and add all the other ingredients. Stir until well combined. (If it seems dry/crumbly, add more molasses–the consistency will depend on what % of your amaranth ended up being puffed.)
  4. Press mixture into pan, refrigerate, cut into bars, and enjoy!

Extra nutrition notes:

  • With the ingredients I use, the entire recipe contains 36mg of iron; a premenopausal woman’s daily RDA of iron is 18mg! For men and postmenopausal women, the RDA is 8mg.
  • For my tahini, I use Artisana Tahini. I’ve noticed that the iron content of tahini can vary somewhat, and Artisana is one of the highest iron contents I’ve found.
  • For amaranth, I use Bob’s Red Mill from Amazon.
  • For molasses, I use Grandma’s.

Enter your email address to subscribe to this blog and receive notifications of new posts by email.

Join 2,418 other subscribers

Recipes

Easy Thai Red Curry Lentils (Vegan, WFPB)

In my neverending quest to find recipes that are quick & easy to make, super healthy, AND also budget-friendly, I’ve found that lentil-based recipes often check all those boxes. Especially for bulk cooking, which really cuts down on the time needed per meal.

These lentils may be one of my easiest recipes yet… especially considering how flavorful they are. I know it sounds unusual to use Thai curry paste with lentils, but they taste really good together. These lentils work well on their own as a stew, or paired with rice to make them last even longer.

(I will admit, I have made even faster meals on occasion: when I needed a 5-minute lunch to bring to work on especially busy weeks, I used to just toss lentils and rice in my rice cooker, and add frozen spinach and seasoning salt. But that’s not delicious enough to write a whole post about 😉 )

Serves 5-6

Ingredients:

  • 2 cups dry brown or red lentils, washed
  • 5 cups water
  • 15oz can coconut milk
  • 10oz bag frozen spinach
  • 10oz sliced mushrooms; I used frozen
  • 4 tbsp red curry paste (make sure it’s vegan–I use this kind)
  • 2 tbsp tomato paste
  • Salt to taste

Directions:

  1. Add the lentils and water to a large pot and bring to a boil. Let simmer until the lentils are soft and most of the water is absorbed, about 20-25 minutes.
  2. Optional: sauté mushrooms in a separate pan with a splash of soy sauce (or water + salt) until they start to get tender. (If you don’t feel like sautéing them, you can just add the mushrooms raw in the next step)
  3. Stir in the coconut milk, frozen spinach, mushrooms, curry paste, and tomato paste to the pot with the lentils. Simmer, stirring occasionally, until most of the liquid is absorbed and it’s a curry-like texture, for about 20 minutes.
  4. Serve on its own or with rice, and enjoy!

Enter your email address to subscribe to this blog and receive notifications of new posts by email.

Join 2,418 other subscribers

Recipes

Baked Bean Mac n Cheese Bowls (Vegan)

I’m working on building a repertoire of recipes that my more junk-food-vegan leaning husband loves and that fit in with my unprocessed preferences. They tend to take a little more effort, but are as delicious as junk food while also being healthy.

This recipe is our favorite hybrid so far. (In case you can’t tell, I generally only share my favorite recipes with y’all!)

It’s a southern-inspired feast that has 3 parts, and they go SO well together. It takes me about two hours to make, which isn’t bad given it results in 5 nights’ worth of dinner for two–and given it tastes as good as our favorite restaurant food and is packed full of veggies & beans. It also happens to be low fat, with the only overt fat being some cashews in the sauce.

Want to make it fat-free, and skip the macaroni? Try the baked beans + kale over a baked potato. That was actually the original version of this recipe for us!

(This recipe is for a bulk amount because feeding my 6’6″ bodybuilding husband with low-calorie-density food requires a LOT of food.)

Serves 8-12

Baked beans

Ingredients:

  • 1 medium-large yellow onion, chopped
  • 4 cloves minced garlic
  • 3/4 cup ketchup
  • 1/2 cup molasses
  • 1/4 cup brown sugar
  • 3/4 tsp salt
  • 3 tbsp apple cider vinegar
  • 1/2 tsp dijon mustard
  • 2 tsp smoked paprika
  • 1 tsp soy sauce
  • Pinch of allspice
  • 4 cans navy beans, rinsed

Directions:

  1. Preheat oven to 350 degrees. Add onion to a pot over medium-high heat, and saute for a few minutes until they start to get translucent. Add garlic and saute for a few more minutes.
  2. Turn off the heat, and add the rest of the ingredients to the pot and stir until well combined. Pour mixture into a 13×9″ pan, cover with tinfoil, and bake for 45 minutes.

Cheese sauce

Ingredients:

  • 2 cups roughly chopped gold potatoes
  • 1/2 cup chopped carrots
  • 1 cup chopped onion
  • 1 cup raw cashews
  • 1/2 cup unsweetened nondairy milk (I use soy)
  • 1 cup water
  • 2 tablespoon lemon juice
  • 1/4 cup nutritional yeast flakes
  • 1/2 teaspoon garlic powder
  • 1.5 teaspoon salt (or to taste)
  • Dash of cayenne (optional)

Directions:

  1. Boil the potatoes, carrots, and onion until tender.
  2. Combine all the ingredients in a blender, and blend until smooth. Add more salt and lemon to taste.

Pasta & Kale

Ingredients:

  • 24oz dry macaroni, cooked according to package directions
  • 32oz frozen kale (or use raw kale that is about 32oz when cooked)
  • 5 large cloves garlic
  • 2 tbsp lemon juice
  • 1 tsp salt, to taste

Directions:

  1. Add the kale and garlic to a pot over medium heat. Saute, stirring regularly, until the kale is tender. Add lemon juice and salt to taste.
  2. Make the final bowl: put the macaroni in a bowl, top with cheese sauce, then baked beans, then kale, and enjoy! (And, possibly, become as addicted to it as we are)

Enter your email address to subscribe to this blog and receive notifications of new posts by email.

Join 2,418 other subscribers

Recipes

Vegan Black Bean Plantain Burger Recipe (WFPB)

Confession time: I’ve never been a fan of veggie burgers. Especially grain or bean-based burgers.

When I first went vegetarian 15 years ago, vegetarian burgers weren’t anything like they are today. Having to eat them at every school function or barbecue got a bit tiring, and I never found a very satisfying recipe for veggie burgers. Then the Beyond and Impossible burgers came on the scene, and since then I’ve pretty much just eaten those whenever I have a burger craving.

But, I love to eat whole food plant based (aka unprocessed food) most of the time. So I decided to try coming up with my own recipe that would be good and unique enough that it could have its own role at the table, besides just trying to replace a burger.

I went with a Caribbean vibe, and was inspired by empanadas since black bean & plantain are a match made in heaven when used in empanadas… so why not burgers? I also made an avocado lime spread for it, and the combo is so good that I actually enjoy just having the patty + spread at times, without a bun or anything.

Makes 4-6 patties

Ingredients:

  • 1 can black beans
  • 1 cup red onion, diced
  • 1 ripe plantain, sliced
  • 6 tbsp corn grits (or cornmeal)
  • 6 heaping tbsp whole cilantro leaves
  • 1 tsp garlic powder
  • 1 tsp ground cumin
  • 1 tsp salt
  • 1/2 tsp cayenne

Directions:

  1. Sauté plantain and red onion together over medium-low heat until plantain turns golden brown and onion begins to turn translucent.
  2. In a food processor, add all the ingredients and process until the mixture still has some small pieces remaining, but holds together well. If it is too dry to stick together easily (if you’re using more absorbent cornmeal, for instance), add a tbsp of water at a time until it sticks together.
  3. Form mixture into 4-6 patties about 1” thick. Sauté over medium-low heat for 5-8 minutes per side, until they are lightly browned. Alternatively, you can put them in the oven at 375 degrees: bake 10 mins, then flip, then bake another 10 minutes, or until both sides are crispy.
  4. Top with avocado lime spread and your favorite burger toppings, and enjoy!

Avocado lime spread:

  • 1 avocado
  • Juice of 1/2 lime
  • 1/4 tsp dried chipotle powder
  • 1/8 tsp salt
Mash together all the ingredients until it has a guacamole-like texture.

Enter your email address to subscribe to this blog and receive notifications of new posts by email.

Join 2,418 other subscribers

Recipes

Vegan BBQ Chickpea Salad with Avocado Ranch Recipe (WFPB)

Something about planting seeds for my vegetable garden (which I’m starting this week!) puts me in a salad mood. Just imagining all the organic greens and veggies I’ll be harvesting in a few months makes me start craving fresh veggies right away!

My favorite salad ever is still my addictive Mexican-style salad, but this BBQ ranch one is a very close second. It’s easy, super healthy, totally versatile with any extra veggies you might want to include, and goes well with every type of green I’ve tried so far! (Especially mixed greens or romaine.)

Serves 2-3 as a full meal

Ingredients:

Salad:

  • 2 cans chickpeas, drained and rinsed
  • 1/2 tsp salt
  • 1/2 tsp smoked paprika
  • 6-8 cups mixed greens (or romaine, or spinach)
  • 6 celery stalks, chopped
  • 1/2c finely diced red onion 
  • 1 can corn, drained
  • 1/2c barbecue sauce 
  • 1/2c halved cherry tomatoes (optional)

Avocado Ranch:

  • 1 avocado
  • 1/8 tsp dried dill
  • 1/4 tsp dried parsley
  • 1/4 tsp garlic powder
  • 1/4 tsp onion powder
  • 3 tbsp unsweetened non dairy milk (cashew milk preferable)
  • 1/2 tsp lime juice
  • Salt & pepper to taste

Directions:

  1. Toss chickpeas with salt and paprika. Optional: air fry chickpeas for 10-15 mins at 350 degrees until crunchy, or bake in a single layer in the oven for 20-30 mins at 350 until crunchy, shaking occasionally. 
  2. Make the avocado ranch: mash the avocado together with all the other ingredients until smooth and creamy. Add more liquid as desired if you’d like a thinner texture.
  3. Rinse and drain greens, and add them to your salad bowl. Top with celery, red onion, corn, chickpeas, and any other veggies you’re using. 
  4. Then top with the barbecue sauce and avocado ranch, toss, and enjoy!

Enter your email address to subscribe to this blog and receive notifications of new posts by email.

Join 2,418 other subscribers

Recipes

Beefy Vegan Gravy Recipe (for Biscuits)

Over the summer, I moved to the South after living in California all my life. To celebrate in the months before moving, I had fun experimenting with vegan Southern food–and my husband’s and my favorite dish that came out of that was this gravy with biscuits.

This gravy was a labor of love, but we sacrificed and ate about 4 test batches of it over the months as I developed the recipe. 😉 Through experimentation I’ve found that it should work with any type of vegan beef, but our favorite version is with Impossible, or a mix of Beyond and Impossible meat.

I use Minimalist Baker’s vegan biscuit recipe to serve this with, and they went perfectly!

Makes enough to generously cover ~15 biscuits

Ingredients:

  • 5 tbsp vegan butter
  • 7 tbsp flour
  • 3/4lb vegan beef (= 3 Beyond burger patties, or 1 Impossible pack)
  • 1 large yellow or white onion 
  • 1/2 tsp garlic powder
  • 1.5 tsp vegan chick’n bouillon (I use Better than Bouillon’s)
  • 4 cups unsweetened cashew milk or other neutral non-dairy milk*
  • 3 tsp mushroom umami seasoning**
  • 1/3 tsp pepper
  • Salt & pepper to taste
*This definitely tastes best with cashew milk, but soy or almond would likely work as well. I don’t recommend coconut milk.
**OR powdered mushroom OR 1/2c finely chopped or puréed mushrooms

Directions:

  1. Make a roux: add the butter and flour to a pan over medium heat, and stir together as the butter melts. When the mixture starts to turn golden brown, add the milk and whisk well.
  2. Simmer 10-15 minutes over low-medium heat, whisking occasionally, until milk has thickened substantially.
  3. While the milk mixture is simmering, sauté the vegan beef and onions (and diced mushrooms, if using) together until the beef is about 70% of the way cooked–it will be slightly pink still.
  4. Add the beef and onions to the pot with the milk. Add seasonings, and simmer until it reaches your desired consistency.
  5. Serve over your favorite biscuit recipe, mashed potatoes, or even noodles for a stroganoff feel. It keeps great in the fridge too!

Enter your email address to subscribe to this blog and receive notifications of new posts by email.

Join 2,418 other subscribers

Click on the picture below to pin! 

Recipes

My 2020 Vegan Thanksgiving Feast Menu: 8 Dishes Omnivores will Love too

My big vegan Thanksgiving feast last year was SUCH a hit with my vegan and omnivore family members alike, that I just have to share the dishes I made with you all! I posted my menu from 2 years ago here, but I’ve updated and swapped out some recipes to make it even better.

Usually my goal with my Thanksgiving cooking is to impress omnivores, so I make decadent, food-coma-inducing dishes rather than healthy ones.. which has worked, at least based on the fact that omnivores were fighting over the leftovers!

But this year it’ll just be my vegan husband and I, so I might do healthier versions of some dishes (but I’m including the classic recipes below)! So for this post I’m also including healthy swap options for some of the more decadent dishes.

1. Sweet Potato Casserole

This is my first time sharing this recipe–I’ve made a lot of different vegan sweet potato casseroles, and this one is the most authentic tasting. This recipe was actually passed down from my husband’s mom, and I just had to veganize it because it’s his favorite Thanksgiving dish ever.

For a healthy version, reduce the sugar or take it out of the casserole part altogether (just putting it in the topping). I actually find this recipe to be sweeter than I’d prefer it, but people who eat sugar more often than I do thought it was perfect!

Casserole ingredients:

  • 3 1/2 cups mashed sweet potato
  • 3/4 cup sugar
  • 1/4 cup nondairy milk
  • 2 vegan eggs (we’ve had success with Follow your heart’s and Just egg)
  • 1/2 cup vegan butter
  • 1 tsp vanilla
  • 1/2 tsp salt

Pecan topping ingredients:

  • 1 cup chopped pecans
  • 1/3 cup flour
  • 1/2-2/3 cup vegan butter (less for healthier, more for impressing omnivores)
  • 1 cup brown sugar

Preheat oven to 350 degrees. Mix together the casserole ingredients and put in a casserole dish. Stir together pecan topping and sprinkle evenly on top of the casserole. Bake for 30 mins, until the topping is golden brown and beginning to crisp up.

2. Cheesy Scalloped Potatoes

I have my two potato recipes first, because, well, everyone knows potatoes are the best! (And I’m Irish 😉 ) These cheesy scalloped potatoes have, for three years in a row, been the most universally coveted dish on the table. It’s truly a sad day in the house when the leftovers run out.

For a healthy swap, try using my favorite cashew-potato cheese sauce on the potatoes instead of the vegan cheese and cream sauce.

  • 2 pounds Yukon gold potatoes
  • ¼ cup vegan butter (we use Miyoko’s)
  • ¼ cup all-purpose flour
  • 2 cups vegan half & half
  • Salt & pepper
  • 2 1/2 cups vegan cheese shreds, we used a mix with cheddar & white cheese
  • Paprika
  1. Preheat oven to 350 degree F
  2. Peel the potatoes and boil them whole until they’re starting to get tender, about 15 minutes.
  3. Now make the cheese sauce. Melt butter in a saucepan over medium heat and add the flour, whisking constantly for about 2 minutes, or until the flour turns golden brown. Stir in half & half and cook until thickened, stirring often, for about 2-3 minutes. Remove from heat and stir in 2 cups of shredded cheese. Season with salt and pepper.
  4. Slice the potatoes into 1/8 inch rounds–I recommend using a mandolin to get the slices even. Place 1/3 of the potatoes overlapping in a single layer in the baking dish, seasoning with salt and pepper. Spoon about 1/3 of the cheese sauce on top of the potatoes.
  5. Repeat for two more layers. Pour all of the remaining cheese sauce over the top layer of potatoes. Spread to ensure all of the potatoes are covered.
  6. Sprinkle with 1/2 cup shredded cheese and a dash of paprika for color.
  7. Bake in the 350 degree oven for 20-25 minutes, or until the sauce is bubbly.

My plate of leftovers!

3. Roast

And now for a quick intermission from recipes: we usually go with a store-bought roast (rather than lentil loaf, etc) for a meatier vibe, and so I can focus on the other dishes. In past years we’ve loved Trader Joe’s vegan roasts too. This year we’re planning on going with the new Whole Foods roast I’ve been hearing rave reviews about (if we can get it). Otherwise, we’re thinking of doing Gardein turkey cutlets for a more classic feel.

We also like the Field Roast roasts–I especially like the hazelnut cranberry. We do NOT like Tofurkey’s roast unfortunately.

4. Stuffing

Simple vegan stuffing recipe by the Minimalist Baker

This is always a nice healthy counterpart to the rest of my feast. It’s refreshing to load up on lentils, veggies and starches in between digging into the rich scalloped potatoes and roast. You can also do prep for this the day before by chopping up all the veggies. Or, you could even make the whole thing the day before–it was great leftover!

5. Balsamic Roasted Veggies

In the past we’ve done bacon brussels sprouts, but this year I’m doing an old classic side I love: winter veggies tossed in balsamic vinegar and roasted. It’s healthy and so simple to make, and like the stuffing, it’s nice to have something light in between the other dishes. I don’t ever measure amounts, but here’s what I go off of:

  • Equal parts carrots, red onion or pearl onions, and brussels sprouts
  • Splash of balsamic
  • Olive oil, if desired

Chop your veggies, add them to a bowl, and toss with a big splash of balsamic (and oil if desired) until they’re all lightly coated. Roast in a 400 degree oven until they’re fork tender, 20-30 mins.

6. Healthy Pumpkin Soup with Pepita Cream

This is actually a new one I’m adding in this year–I plan to make it on Tuesday or Wednesday and have it around to tide us over if we start getting hungry before the feast is ready. (Anyone else struggle to juggle getting a bunch of dishes out right on time?) It’s hearty and high protein because it’s actually sneakily based on chickpeas, so if you’re trying to avoid overeating this Thanksgiving, it’s a great dish to start with because it’s very satiating.

Get the recipe in my full post on it here.

7. Dutch Apple Pie

Move over, pumpkin desserts. This ridiculously addictive dutch apple pie is our new dessert centerpiece. I have a full post devoted to the recipe, so check that out to see how to make it.

Warning: if you don’t make enough, it could cause drama over who gets the last slice. It’s that good.

8. Pecan Pie Bars

If you want a decoy dessert to prevent apple-pie-induced family feuds, these pecan pie bars are a nice classic option. These were my go-to dish to bring to nonvegan Friendsgiving potlucks in the past, and they ALWAYS disappear really quickly.

For the crust:

  • 1.5 cups all purpose flour
  • 1/3 cup brown sugar
  • 1/4 teaspoon salt
  • 1/2 cup coconut oil

For the filling:

  • 6 tablespoons coconut oil
  • 1/3 cup maple syrup
  • 2/3 cup brown sugar
  • 1/3 cup coconut cream (or coconut milk for a lighter version)
  • 2 cups chopped pecans
  1. Preheat oven to 350, and line a 9″ pan with parchment paper.
  2. Combine the crust ingredients (flour, sugar, salt, and coconut oil) and stir until they combine into a dough. Press into the bottom of the pan and bake for 15 minutes or until the crust is slightly firm to the touch.
  3. Now for the filling: stir the coconut oil, maple syrup, and sugar in a sauce pan until combined, then boil for 1 minute. Remove from heat and add in the coconut cream and the pecans.
  4. Pour the filling onto the crust and spread it evenly.
  5. Bake until the filling is bubbling and set (no longer runny), 20-25 minutes. Allow to cool completely before cutting.

9. Bonus: Healthy Pumpkin Risotto

I’m calling this a bonus recipe because I don’t think I’ll actually make it this year–we had it for the last few days and LOVE it, but now we’re up for some variety. But if you’re looking for something a little different to include in your Thanksgiving spread that’s healthy, oil-free, and yet decadent-tasting, this is a great option. See the full post on it for the recipe.

I hope you have a wonderful Thanksgiving, either virtually or safely spent with the ones you love. ❤

Recipes

Healthy Vegan Pumpkin Risotto (Oil-free + Instant Pot Friendly)

I’ve used the same 7-dish Thanksgiving menu for the last two years (because it has gone over SO WELL with vegans and omnivores alike), but this year I decided I wanted to come up with something new and unique to add.

Enter this healthy pumpkin risotto: it’s savory, it’s slightly sweet, it’s simple to make, it’s creamy. It’s a nice healthy contrast to some of the more oil-laden Thanksgiving classics, but still goes over well with more classic palates. And as a bonus, it’s easy to have it cooking in the background while you make the more complicated dishes, since it doesn’t need more than ~15 mins of really active prep time.

And as a bonus bonus, it’s Instant Pot friendly too. (That’ll help free up my limited supply of pots.)

If you want to make it completely whole-food-plant-based friendly, you can also try subbing brown rice in for the arborio. You will want to add more water and cook longer to achieve a risotto-y texture, though. You can also easily sub in other types of squash instead of pumpkin!

Serves 4 as a full meal; serves 8 as a side

Ingredients:

Blender:

  • 3 – 15oz cans pure pumpkin puree (NOT pumpkin pie mix)
  • 4 cloves garlic
  • 2 apples, quartered
  • 2 tsp yellow or white miso paste
  • 3 tbsp maple syrup
  • 1.5 tsp dried sage
  • Dash red pepper flakes
  • 1 cup cashews
  • 1/2 cup vegetable broth

Saute:

  • 1 onion, chopped fine
  • 3.5 cups vegetable broth
  • 2 cups arborio rice*
  • 1/2 cup dry white wine

Directions:

  1. Put all the “Blender” section ingredients into a blender or food processer, and blend until pureed. Set aside until step 5-6.
  2. Add the chopped onions to a pot over medium heat–or your IP’s saute function–adding splashes of broth (from your 3.5c of broth) as needed to saute them until translucent.
  3. Add the rice, and saute for 3-4 minutes. Then add the white wine, and saute another 2 minutes.
  4. Add in the remaining broth, and push all the onion and rice grains down the sides of the pot so they are submerged.
  5. If using a pressure cooker: cook on low pressure for 6 mins, and release pressure immediately after. Add the blended pumpkin mixture, and turn on the saute setting. Saute, stirring frequently, until the rice is tender and the risotto is creamy but not runny.
  6. If using a pot on the stove: cover pot and bring to a boil, then simmer covered for 15 mins. Add the blended pumpkin mixture, then simmer uncovered, stirring regularly, until the rice is tender and the risotto is creamy but not runny.
  7. Add salt and pepper to taste. Serve topped with more sage or fried sage leaves and cashew cream, if desired.

Enter your email address to subscribe to this blog and receive notifications of new posts by email.

Join 2,418 other subscribers

Click on the picture below to pin!