Recipes

I’ve Started Designing Vegan-Themed Merch!

Hey guys!

Long time, no see. I’ve been working on a bunch of recipes to start posting here (currently tweaking and refining), so hopefully you’ll be seeing more of me.

In the meantime, I’ve been working on something else too. I realized I’ve had a problem: good vegan merch is hard to come by. It always takes a lot of digging to find decent vegan T shirts and workout tanks, and they’re usually really overpriced. So I decided I’d try to help fix the problem myself by making my own!

As of yesterday I’ve been uploading my own designs (mostly vegan themed) to Redbubble, where people can buy them as shirts, stickers, mugs, totes, pillows, phone and laptop cases, pretty much everything. The prices still aren’t as low as I’d like them (and they vary wildly by shirt style), even though I lowered the default markup (aka I lowered the percent of money I get), but it’s better than most stuff I’ve seen. I’m planning to upload a ton more, and I’m sure I’ll learn as I go, so stay tuned!

So, if you’re interested in vegan swag and want to help support a poor vegan grad student, check out my brand new shop! (Also linked in the menu bar above)

And if you have any suggestions, let me know–I’d love to take custom requests 🙂

Click here for the shirt above

Click here for the bag above

Years Past: Food & Exercise Diaries

Higher Carb Starch Solution: Results and What’s Happened Since!

Update 2021: if you want to know what my diet and progress have been like since this post, see my current Instagram! Also, check out my Youtube playlist for in depth videos on my different diets, weight loss, and before & after photos. 

It’s time for a post that has been in my drafts for months: the final results and thoughts about my higher carb starch solution experiment! (If you don’t know about the starch solution, check out the book)

The fact that it’s taken months for me to post this means I can also talk about the long term effects (and if the weight stays off) and what I’ve been doing since then.

Photo Apr 28, 2 06 34 PM

Results and thoughts about the 4 week experiment: (see original post)

  • I lost 3 pounds–from 121.5 to 118.5lbs, which is a big loss for me as I’ve been hovering at 120-122 for years–most of which happened in the first week. I think I ate too little in the first week, which made me crave a lot of fat in the following weeks–I have a lifetime habit of craving fat and pastries whenever I’m in too steep a calorie deficit!
  • Counting calories (which I did for the purpose of sharing my intake with you guys, not for restricting them) stressed me out and got in the way of intuitive eating. For future food diaries, I think I would leave out the calories/macros. For example, when I had a smaller breakfast because I wasn’t hungry, I would compensate by eating more for lunch simply because I thought I “needed” more calories–but then I would overeat til uncomfortably full just to meet some arbitrary calorie requirement!
  • I think that my happy zone–aka eating whatever I want without thinking about macros–is around 77% carbs, 12% protein, and 11% fat. Before this challenge it was more like 75/10/15, so I guess it has moved my tastes towards a slightly lower fat diet! (These may seem like tiny changes, but 4% is a big change when the total is only 11%!)

Overall, it seems that this challenge showed me how it’s almost too easy to lose weight while eating to satiation on high carb, and if you have rebound binge eating like I do, you have to make sure to hit a sweet spot with your calorie deficit if you want to be able to stick to it! It’s also helped reinforce my intuitive eating by reminding me that calorie counting is not only not particularly useful, but actually gets in the way of eating what my body needs.

Since then & Goals:

  • Since May, I’ve lost 2.5lbs more and am down to 116lbs, just doing intuitive eating (still high carb), and running, and occasional lifting! I got a dog right after the end of the experiment, and I think all the walking helped some too 🙂 Progress photo below is at 117 a few weeks ago, featuring little miss Maia! (she’s always improving my photos)
  • My current main goal is to replace my pooch with some semblance of abs by September. The weight isn’t particularly important, but is easier to measure progress with than the mirror.

Photo Jul 03, 2 18 14 PM

Thanks for reading!

Miche

Recipes

Recipe: Fat-Free Whole Wheat Pancakes [Vegan, HCLF]

Photo Feb 28, 9 16 58 AM

I came up with this recipe years ago, and I’ve never gotten tired of it: I still find myself making it on the weekends. It’s a healthy start to your day, and is easy to dress up as you please–I usually opt for chocolate chips, with banana slices and maple syrup on top!

It’s also easy to make your own pancake mix for this: what I like to do is mix up a tupperware-full of the dry ingredients, and use that throughout the weekend. That way I can just roll out of bed, add the wet ingredients, and start cooking the pancakes right away!

5-29-13 028Photo Feb 27, 11 09 46 AM

Makes 4 medium sized pancakes

Ingredients:

  • 1 cup whole wheat flour
  • 1 tablespoon brown sugar
  • 1 1/2 teaspoons baking powder
  • 1/8 teaspoon salt
  • 1/2 teaspoon vanilla extract
  • 1/2 cup water
  • 1/2 cup soy milk
  • Add-ins: Chocolate chips, nuts, berries, cinnamon, etc.

Directions:

1. In a small to medium bowl, mix together the dry ingredients: flour, brown sugar, baking powder, and salt.

2. Pour vanilla, soymilk, and water into a well in the center of the dry ingredients. Whisk until lumps are gone, and stir in addins if desired.

Note: I often find myself adding more liquid at this step as I like a thinner batter sometimes, but the thickness is really a matter of preference: they turn out great regardless!

3. Coat skillet with cooking spray, and set to medium heat. Once the skillet is hot, pour the batter until your desired pancake size is reached (generally around 1/3 cup; I, however, made a giant pancake). Drop your add-ins like chocolate chips evenly into the batter.

4. Cook until bubbles have appeared and popped on surface, then flip to other side. Cook until browned.

5. Serve with your favorite toppings.

5-29-13 0205-29-13 040

Thanks for stopping by!

Miche

Recipes

Creamy, Low Fat Broccoli Soup Recipe [Vegan, HCLF]

12-07-15 028

Calling all soup lovers! If you like broccoli and cheese soup but don’t want the dairy or processed fake cheeses, this recipe is for you. (Especially my fellow high carb, low fat vegans!)

Although we don’t get to experience much of a real winter where I am in California, I still can’t help but love soup season. I’ve been experimenting with spicy lentil, roasted tomato, and sweet potato soups over the last few weeks, but I keep coming back to this broccoli one. Yukon gold potato lends the soup its creaminess, and the cheesy flavor comes from nutritional yeast, along with onions, garlic, and a few cashews. It’s also flexible and fun to customize: you can add whatever veggies you have on hand, and vary amounts as you please and it’ll still turn out great.

It’s packed with nutrients (and even quite high in protein!), it’s quick and easy to make, and it’s especially delicious when paired with toasted sourdough!

12-07-15 037

Serves 2-3

Ingredients:

  • 1 medium yukon gold potato (about 200g)
  • 2-3 cups broccoli pieces
  • 2 cloves garlic
  • 1/2 yellow or white onion
  • 4 stalks of celery
  • 4-5 large mushrooms
  • 2-3 handfuls of kale or spinach
  • 1 tsp vegetable broth powder (or a vegetable bouillon cube, or veggie broth)
  • 2 tbsp cashews (omit for lower fat)
  • 3-4 tbsp nutritional yeast
  • 2 cups water
  • 1 cup unsweetened almond milk or other non-dairy milk
  • Salt and pepper to taste
  • Toasted bread (especially sourdough) for serving

Instructions:

  1. Boil or microwave potato until soft.
  2. Roughly chop the garlic, onion, celery, and mushrooms. They’ll all be blended later, so just chop them enough so they have some surface area for cooking.
  3. Dry-sauté garlic and onion over medium heat until the garlic toasts slightly, then add the water, broccoli, celery, mushrooms, potato, and kale or spinach. Simmer until soft.
  4. Remove from heat, and add to blender along with cashews, nutritional yeast, and almond milk. Blend until smooth and creamy. Add more water and/or almond milk as necessary to get soup to the consistency you prefer.

Serve with freshly toasted bread, and enjoy!

12-07-15 009

Nutrition information (for half the recipe):

Calories: 250 | Fat: 6g | Carbs: 35g (5.5g fiber) | Protein: 14.5g

Side note: I've been in LOVE with this broth powder. Finally, a broth-maker that is both oil free and lasts indefinitely!
Side note: I’ve been in love with this broth powder since I discovered it a month ago… finally a way to make broth that is both oil free and lasts indefinitely!

(This is cross-posted from my recipe-only blog)

Recipes

Recipe: Creamy Tofu Tikka Masala (Vegan)

4-06-15 670

Ever since I went to college three years ago, the biggest obstacle to being 100% vegan was an Indian restaurant called Biryani house. My college town is teeming with vegan options, but this place had the absolute best food I’d ever tasted in my life. And that’s a big deal for me, because I’ve had the good fortune of eating at a lot of great restaurants.

I used to go there with friends a couple of times a month to gorge myself on their freshly baked aloo naan, perfectly spiced vegetable biryani, and most importantly, their decadent paneer tikka masala. Unfortunately, my vegan aspirations were dashed due to the fact that their tikka masala not only sported paneer (cubes of Indian cottage cheese), but was also likely drowned in heavy cream.

(Fun fact: my weight seemed to fluctuate along with how often I went there.)

When I finally got more serious about being 100% vegan last year, I had to stop going there. And as if to enforce my self-discipline, it actually closed a few weeks after my decision, for unknown reasons. A bittersweet moment.

Anyways, getting to the point: I’ve been trying to recreate that tikka masala for quite awhile now. After a few tries–all of which were delicious, but not decadent like theirs–I finally came up with a recipe that tasted almost the same. It’s creamy, spicy, much healthier than its restaurant counterpart, and most importantly, vegan. And I’m pretty darn excited about it.

Now to work on aloo naan recipes!

4-06-15 655

Serves 4-5

Ingredients:

  • 400-500g super firm tofu (the kind that is vacuum sealed instead of water packed, and has the density of a block of cheese–I use Tofu Yu. If you can’t find that, try freezing an extra firm block then thawing it out and using it as you would super firm.)
  • 80g cashews (a little less than 3/4 cup), soaked overnight or for a few hours
  • 15oz can of plain tomato sauce
  • 1/2 white onion
  • 1-2 large cloves garlic
  • 1/2 + cup unsweetened almond or cashew milk (as needed)
  • Handful cilantro
  • 1 + 1/2 tsp cumin
  • 1/2 tsp cardamom
  • 1/2 tsp coriander
  • 1/4 tsp ground ginger
  • 1/4 tsp nutmeg
  • 1/4 tsp cayenne (more as desired)
  • 1/4 tsp paprika (more as desired)
  • 2 pinches of amchur powder

Directions:

1. Cut up the onion and garlic, and combine them with the tomato sauce in a large pan over medium heat. Add in the cumin, cardamom, coriander, ginger, nutmeg, cayenne, paprika, and amchur powder, and simmer for about 15 minutes.

2. While the sauce is simmering, cut your tofu into cubes, and fry until golden (I used a teaspoon of coconut oil, but you could also do it dry). Remove from heat once golden.

3. After 15 minutes, remove the sauce from heat. Allow to cool (if necessary; I didn’t have to for my vitamix) and blend with the drained cashews until smooth and creamy. Add unsweetened almond or cashew milk as needed to get it to your desired consistency.

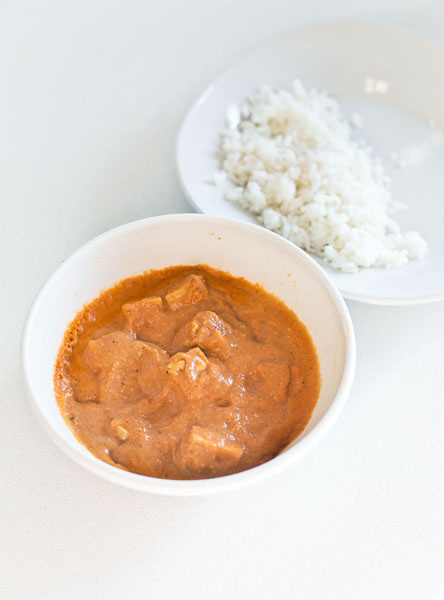
4. Combine tofu with sauce in a serving bowl, and serve it with jasmine rice, naan, your preferred grain, or enjoy it solo!

Nutrition info: 

  • Calories per 1/5 of recipe: 230 calories
  • Carbs: 17g (3g fiber)| Protein: 15g | Fat: 13g

4-06-15 677 4-06-15 605

Thanks for reading!

Miche

(Cross-posted from my recipe-only blog)